

Today I’m giving you the very first tutorial from our master bedroom makeover! I’ve dreamed of beautiful planked walls in our home for a long, long time, and our master bedroom was the perfect blank canvas to try them. They turned out even better than I imagined, and I am so excited to share this project with you!
For those of you who are just joining the master bedroom makeover, I highly recommend you check out last week’s post where I shared the “before” photos of the room and my vision for the design. Our bedroom is an attic space, which means we’re dealing with a lot of short, slanted walls and very awkward spaces. The best idea I came up with to deal with all the awkward angles was to paint everything white and tie all the walls together with nice, wide planks. The white walls would brighten the space up tremendously since we only have one tiny window in the room, and the planks would add a cozy, rustic feel to the space, which it definitely needs since this is a brand new addition built into our 1940’s home. It needed a little “old” added to it!
After tackling board and batten walls in our living room and dining room, I will say that planked walls are MUCH easier to do. The board and batten required a lot of measuring, and there were so many steps to the process… the battens, the top ledge, the extra trim we added, caulking every single seam, and then painting it all seemed to take FOREVER. I absolutely love the way it looks in our living room, but it was definitely a big undertaking in such a large space. When you’re doing planked walls however, after you get the first row of boards up, it pretty much goes on auto pilot after that. You’re just adding board after board until the walls are done, and you get to paint everything at once with a big roller instead of each individual piece of trim with a paint brush like we did with the board and batten.
Jeremy and I did this project over the course of a few days, and I tried to take plenty of pictures along the way so you could see the whole process.

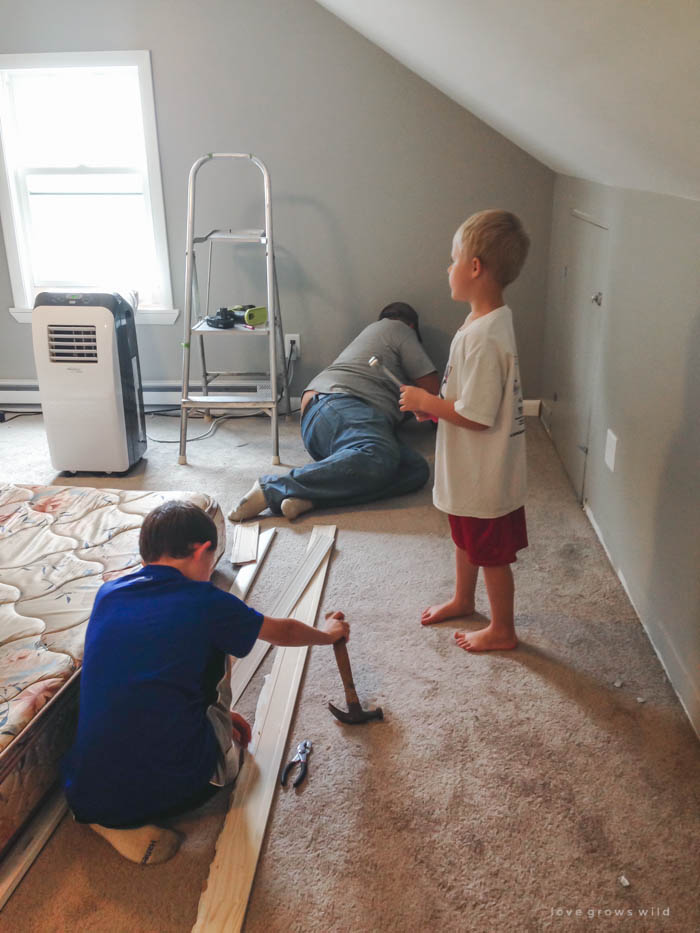
The first step was clearing out the room and removing all the trim. I didn’t plan on removing the baseboard trim at first, but Jeremy convinced me that it would look better if we did, and I am so glad we made that decision. I wanted the planks to look like they have always been hiding behind the drywall in this room, and starting the planks above the trim would make it obvious that they are a new addition. Jeremy carefully pulled the trim off the wall, Alec (our oldest) pulled nails out of the trim, and Wyatt (our little guy) hammered in any remaining nails in the wall. I love that the boys are getting older now because they are SUCH handy helpers on these big projects!
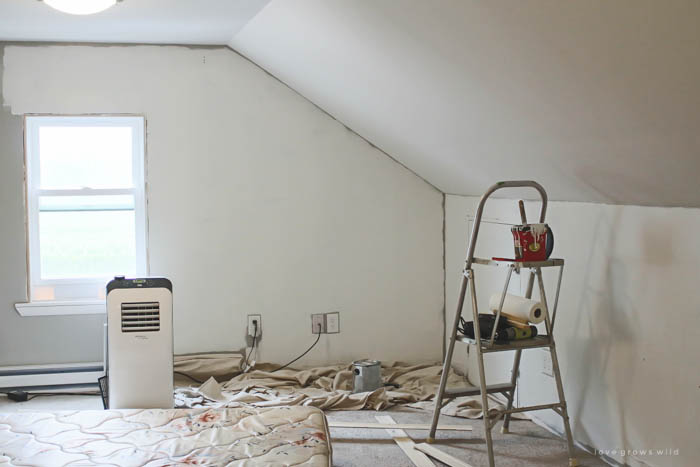
After the trim was gone, I gave the gray walls a quick coat of white paint. I knew that I wanted the planks to have little spaces between them, and after reading a few other plank tutorials (here and here), I knew that if the walls weren’t the same color as the planks, you would definitely see the gray between each plank. It only took about an hour, and I didn’t worry too much about getting every little corner.
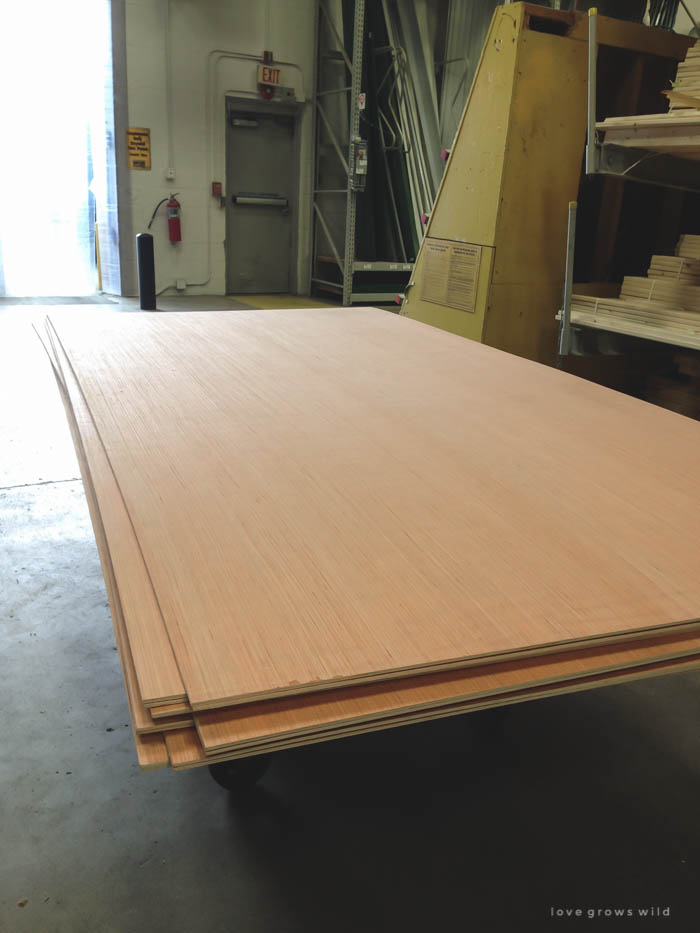
While the walls were drying, we headed to Lowe’s to pick up our planks. We decided to use 4 x 8 foot sheets of 1/4″ flooring underlayment because it is relatively inexpensive (around $13-$14 per sheet) and easy to work with.
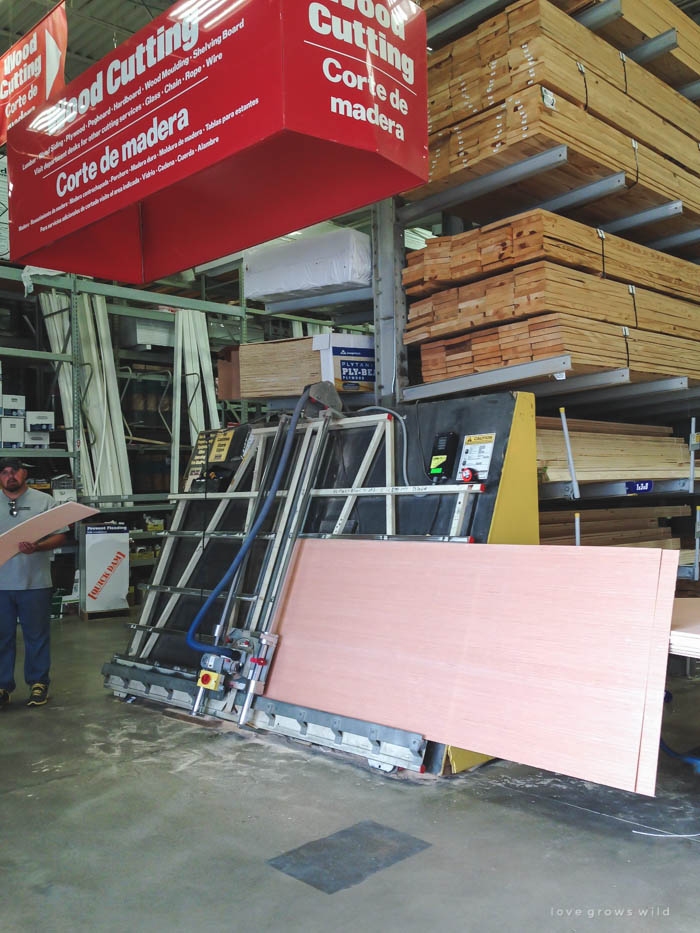
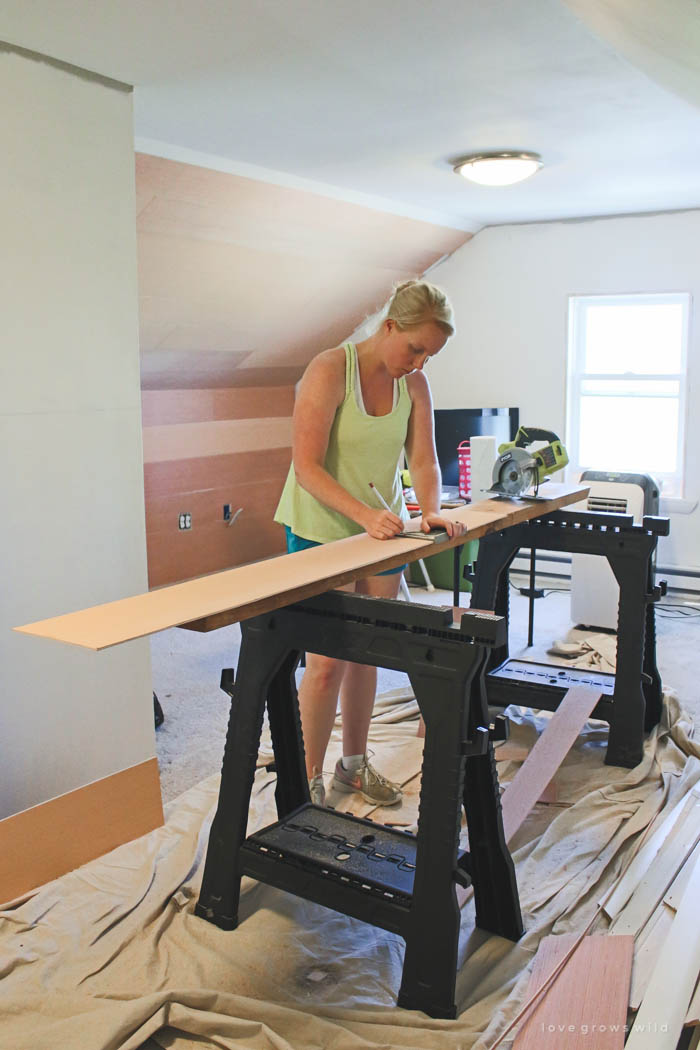
We don’t have a table saw at home, so we had them cut the planks in-store for us. We wanted 8″ wide planks and needed twenty 4 x 8 foot sheets to cover the entire room. The saw does a good job, but the edges of the planks were pretty rough, so I put Alec to work sanding down all the edges for us. We had A LOT of planks that needed sanding, so this kept him busy for awhile!
Note: Some of the links in this post are affiliate links, which allows me to make a small commission from your purchase, but your purchase price stays the same. Thank you for helping support our blog!
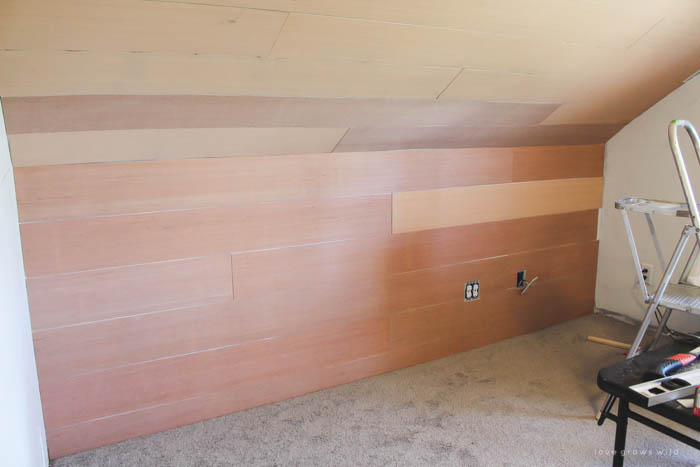
We started adding the planks on a short wall where our bed sits. Starting on the left side, we marked where the first row of planks needed to go using a level. Most homes are not perfectly level, and this room was certainly no exception. Making sure to level the first row of planks ensures that the rest of your wall will be level as well, so don’t skip this step!
We grabbed the first 8′ long plank, held it level on the wall, and nailed it in using our brad nailer. The rest of the planks would need to be cut to fit the wall, so we set up sawhorses in the room and used a spare 2x board as a cutting surface. We cut the next plank to size using a circular saw and nailed it in next to the first plank. We wanted the planks to feel really rustic, so instead of butting them up right next to each other for a seamless look, we used nickels as spacers in between the rows of boards and also in between the short ends of each plank as well.
To start the second row, we used the rest of the plank we just cut to finish the first row. Again, starting on the left side, we held the plank up to the wall, used nickels as spacers between the rows, and nailed the plank in place. If we started with a new 8′ board for every row, the seams would all be in the same place, but by using the end of the previous plank to start the next row, all the seams will be in a random pattern and have a more natural, rustic look.
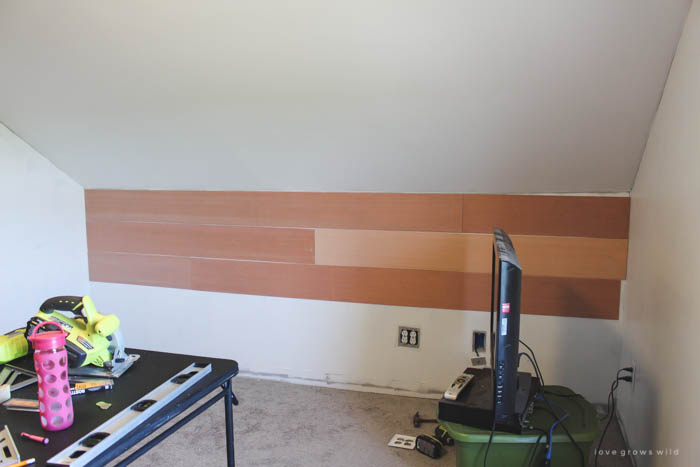
At this point, the project kind of goes on auto pilot. You measure, cut, and nail the planks in place until the whole wall is done.
When we got to the top and/or bottom of the wall, we had to trim the width of the boards to fit. We have carpet in our bedroom, so we made sure the planks went as far down into the carpet as we could get them, because at the time we weren’t sure if we would add the baseboard trim back over the planks or not. I didn’t want to see a gap between the bottom of the planks and the carpet, and it actually worked out really nice. We had just enough space to fit the planks down between the wall and the carpet.
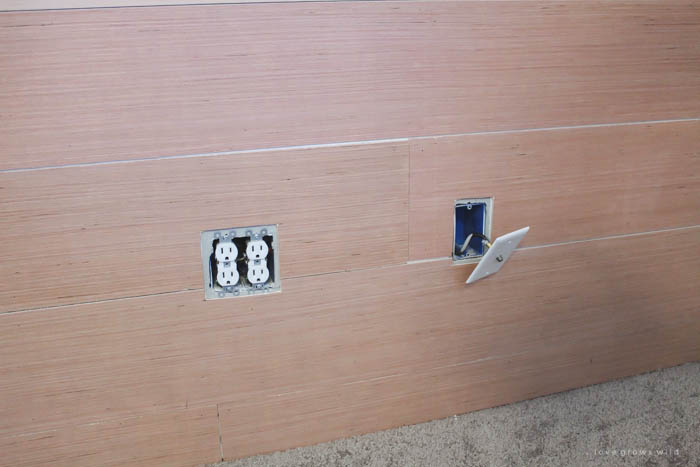
Jeremy also had a winning idea when it came to the outlets. I was trying to keep this project as hassle-free as possible, so I was just going to plank around the outside of the outlet covers and caulk the seam. But Jeremy said we could buy spacers from the store that would extend the plugins, so we could put the outlet covers on OVER the planks. Again, I am SO happy I had him there for advice, because it really made a difference in the end result. It looks much better than my idea! It also allowed us to be a little less precise when cutting the planks around the plugins. As long as the opening was smaller than where the outlet cover would sit, we were good to go. Jeremy used the circular saw to do most of the cuts around the outlets and finished the corners with a utility knife.
You’ll notice that the planks are definitely not 100% perfect. Some were slightly wider than others, so we just made adjustments as we went along. Most of the time we were able to use the nickels as spacers, but sometimes we would get in a tight spot where the nickels wouldn’t fit. And guys, it is totally okay! We wanted a rustic look anyway, so any little variations just gave the room even more character.
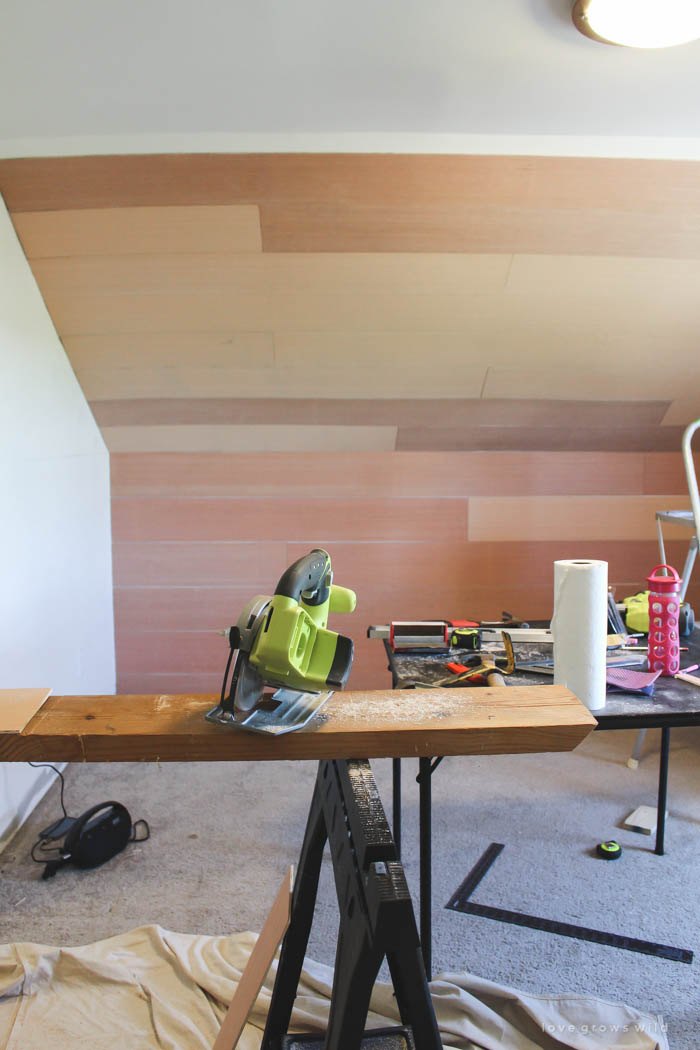
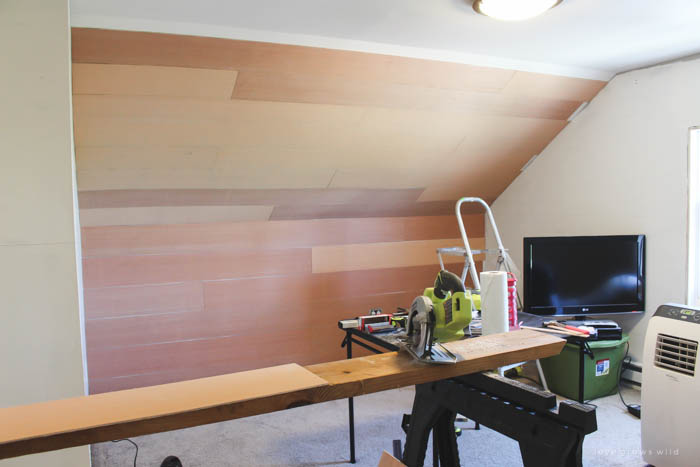
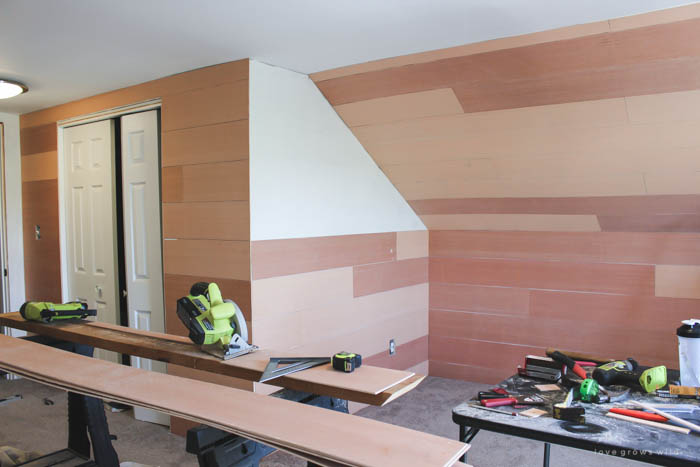
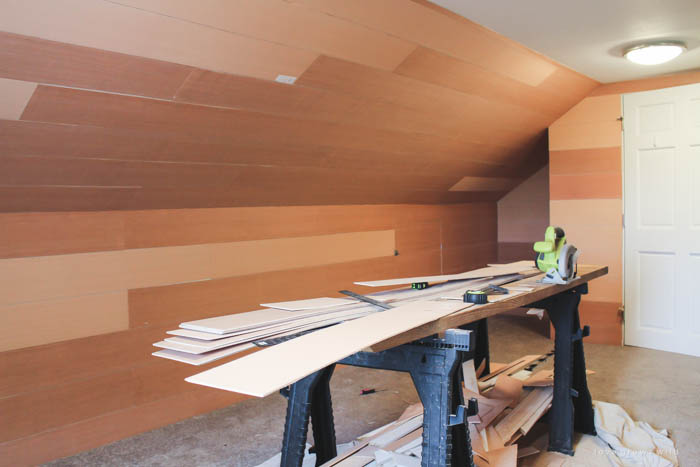
After the first wall was done, we started wrapping our way around the room. Measuring, cutting, nailing, measuring, cutting, nailing…
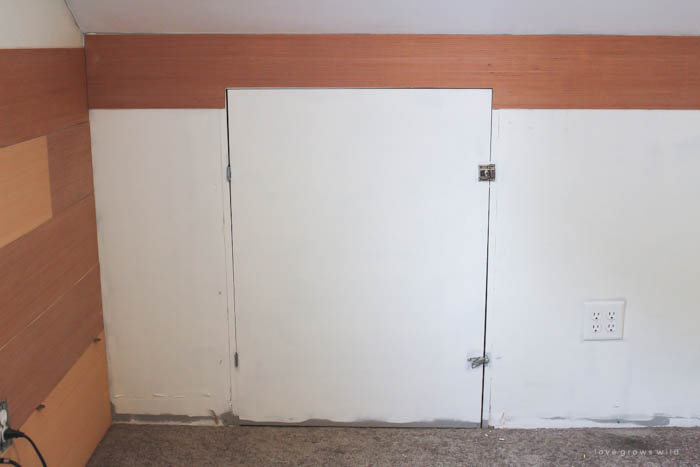
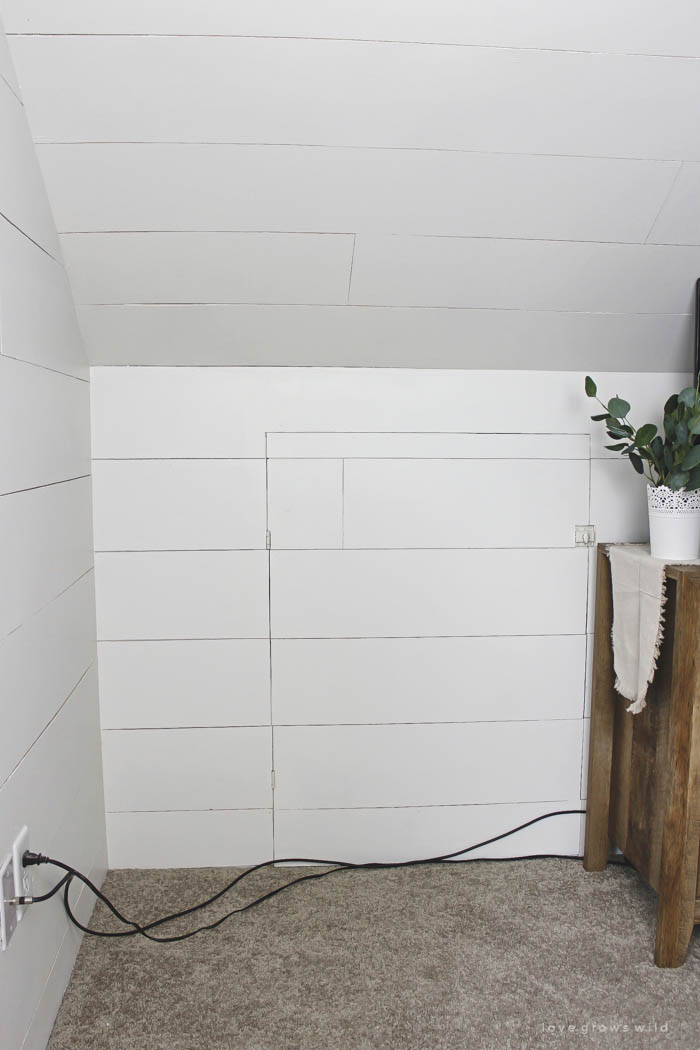
We have two little doors in the room that give us access to storage behind these short knee walls. I love the extra hidden storage, but the doors were a major eye sore. When we first finished the upstairs, we added white trim around the doors to give them a more “finished” look. But it really just made these awkward doors stick out like a sore thumb. I wanted to get rid of the trim and add planks all the way across the doors so they would blend in with the wall and not be so noticeable.
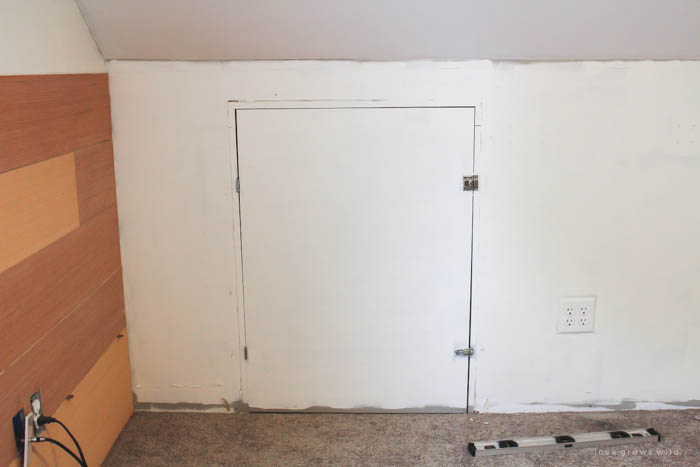
We added the first plank above the door with the section over the door cut out.
Then we nailed the section we cut out right onto the door.
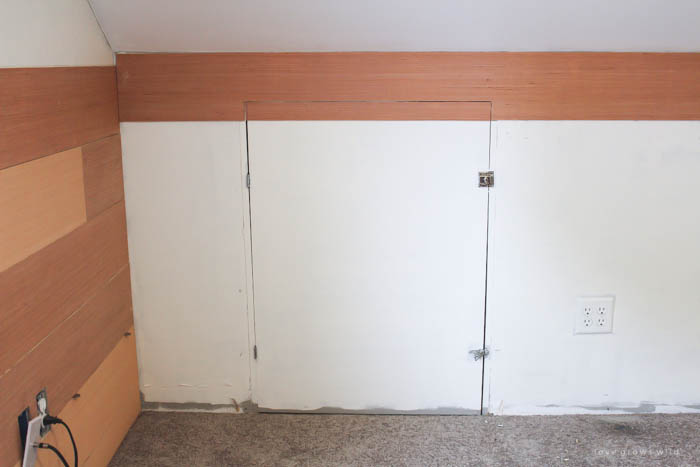
You do still see a small line where the edge of the door is, but it looks much more cohesive than it did, and once it all gets painted it will look even better.
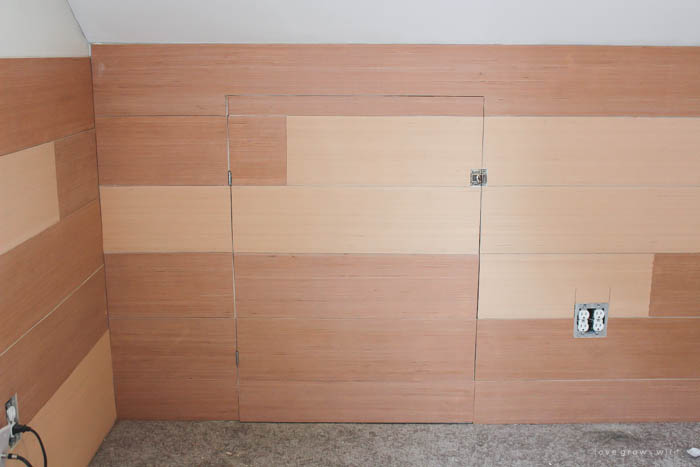
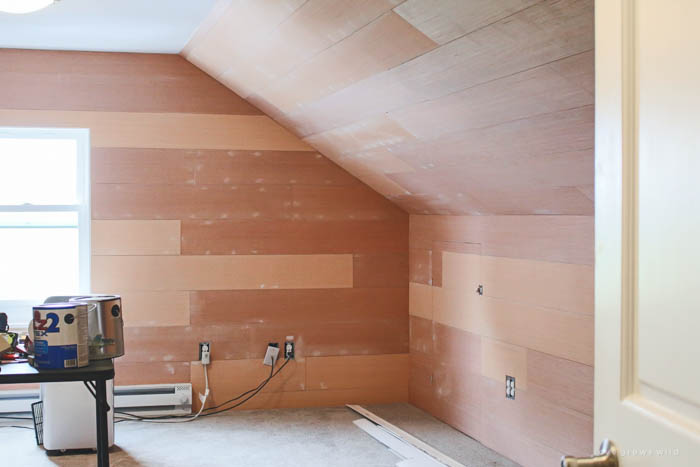
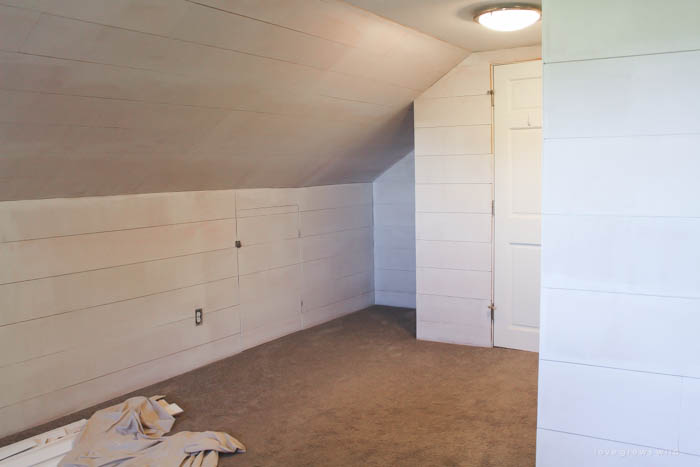
Putting up the planks was honestly the easy part. Figuring out the angled cuts because of our slanted walls was the hard part. But once the whole room was planked, we cleaned up the tools and sawdust and got ready for paint!
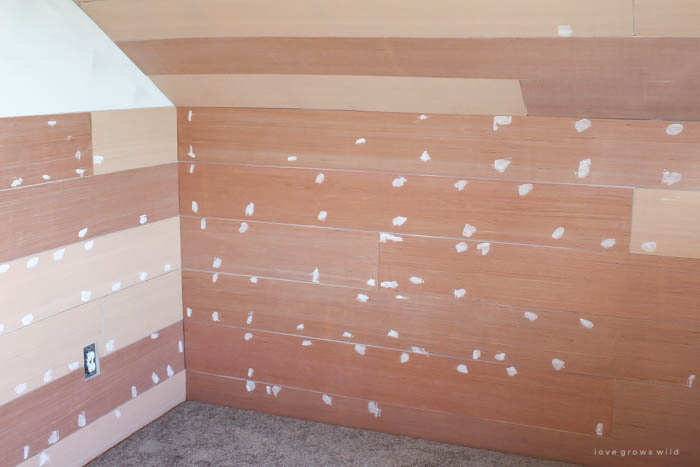
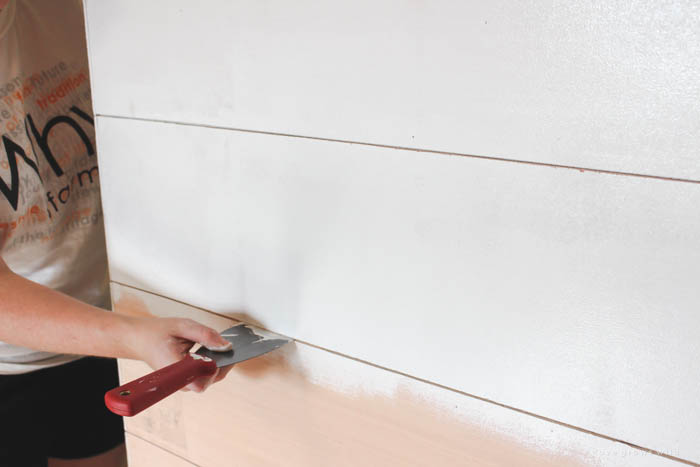
I started by spackling over all the nail holes using a putty knife. I’m going to be totally honest and say that I probably only covered around 75% of the nail holes. It is just SUCH a tedious process in a large room, and I want it to look rustic anyway, right? I made sure to cover any holes where the nails went really deep into the planks, but any spots where the nail was mostly flush with the plank, I just left alone.
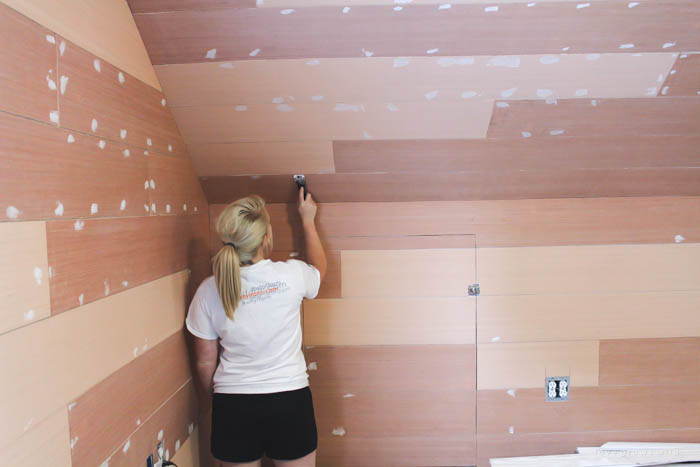
After spackle, we sanded the planks smooth and wiped the room from top to bottom with a damp rag to get rid of any dust.
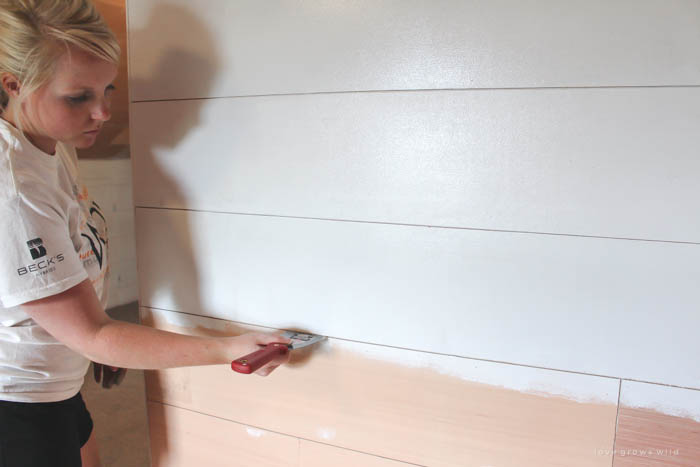
And then the first coat of paint went on! I started with primer because I knew this material would soak up quite a bit of paint. I used Kilz 2 Latex Primer and a paint roller for the job.

I was worried about paint dripping into all the spaces between the planks, but as long as I didn’t overload the roller with paint, I was able to just roll right over the planked wall without any problem. As I finished each section, I checked the seams and used a putty knife to clean out any paint that had built up.
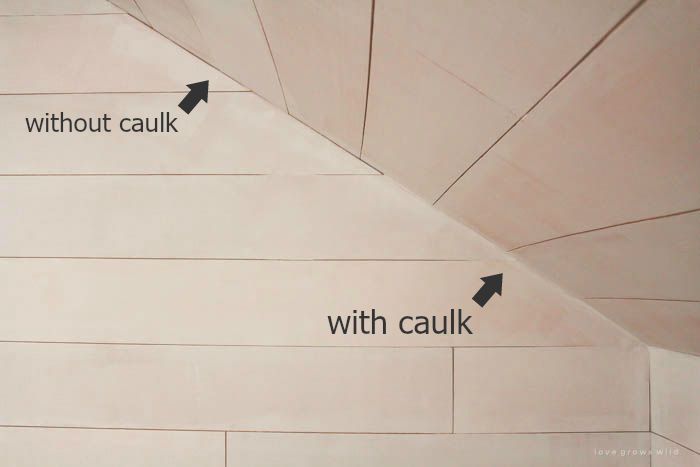
Once the primer was on, I took a look around the room to see what needed to be caulked. I ended up caulking the seam between the ceiling and the top planks, which hid any unevenness. Remember, we made our planks level… not in lined up with the crooked room. The caulk hid the seam perfectly.
I also caulked the seam where each wall met. You can see in the photo below the difference between where I had and had not yet caulked. There are enough lines already going on in this room between the planks and the angled walls, so I wanted to eliminate the seams where the walls met to give it a more finished look. I contemplated adding quarter round over the seams, but the caulk did a fine job, and I didn’t want to spend anymore than necessary.
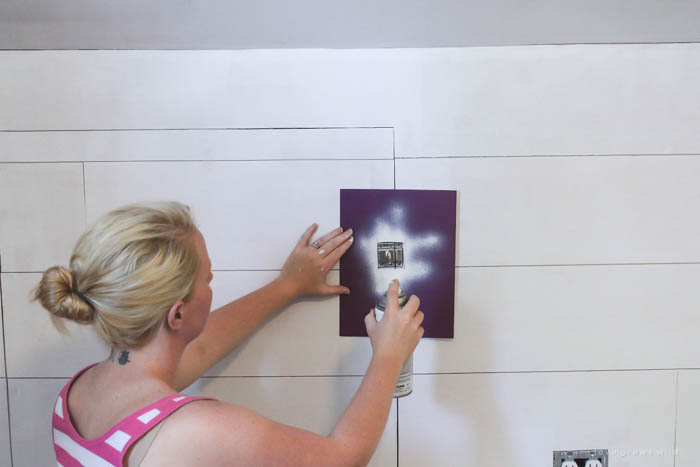
Besides caulking, I also painted the hardware on the knee wall doors before adding the final coat of paint on the walls. At this point in the project, I was too lazy to remove the hardware and slightly worried that I wouldn’t get it lined up right again (these things are finicky). So I just cut a hole in a scrap sheet of paper, held it up over the hardware, and spray painted the hardware white. This way I didn’t get spray paint all over the wall, and I didn’t have to mess around with removing all the hardware. Jeremy had plenty of genius ideas throughout this project, but I felt this was my little nugget of genius. I take my victories where I can. : )
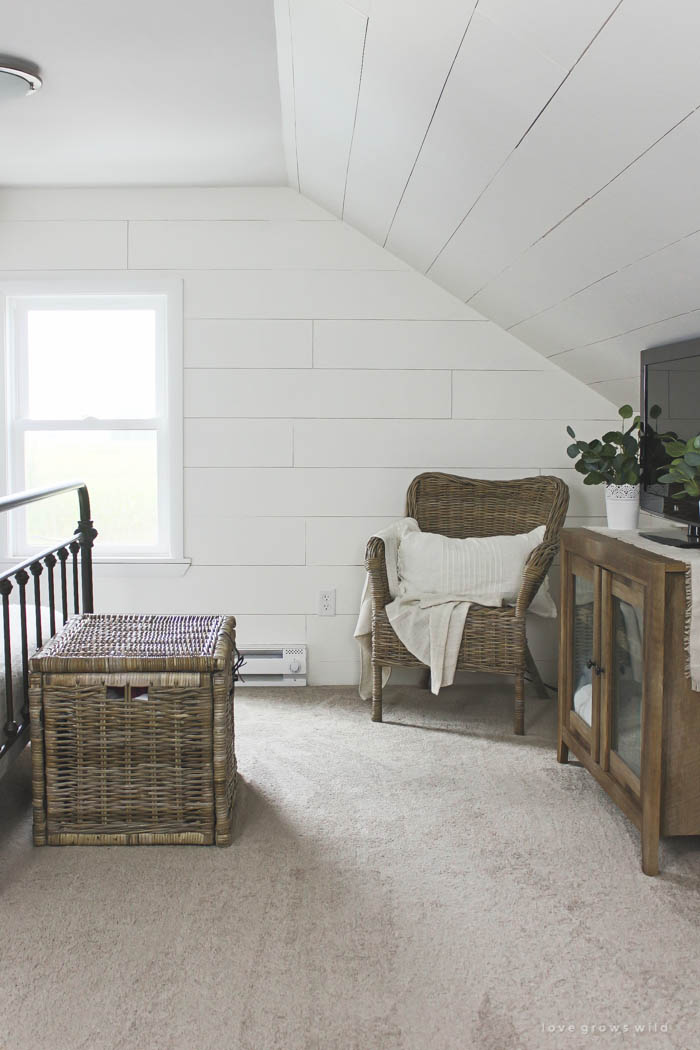
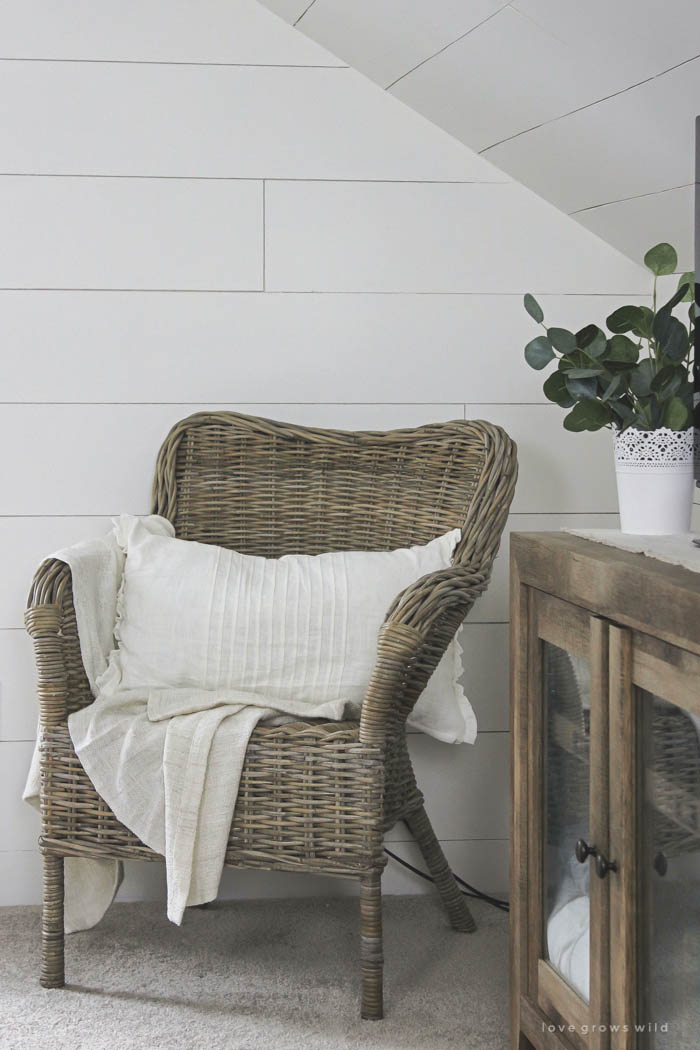
We finished the plank walls with a coat of Valspar Reserve paint in an eggshell finish in the color Dove White. I normally don’t splurge on the most expensive can of paint on the shelf, but when I do large projects like this, I weigh the time it takes to paint multiple coats of a cheaper paint vs. one coat of a more expensive paint. I’d much rather pay a little more and save days of painting, so that’s why I went with the Reserve line. We added the trim back on the window, closet, and door, but left off the baseboards. I actually like the look of the planks without it!
We still have a lot of work to do before we can call this room finished, but we moved in a couple pieces of furniture, and already it looks amazing in here. I am in love, love, love with our beautiful white wide plank walls!!
I promise I’ll share more details about the furniture and the rest of the room soon, but I had to hide some of the other projects we’ve been working on in here, so you don’t get to see the WHOLE space just yet. You are going to DIE when you see what I have in store for next week’s makeover update!!
So far, we’ve added this bed, this trunk from Ikea, this chair from Ikea, and also this blanket and this pillow from Ikea. Did you see on Instagram that Jeremy and I made our very first trip to Ikea together? It’s a 6 hour round trip, but luckily we had a babysitter for the boys, so we survived! The back of Jeremy’s truck was packed with Ikea goodies, so the wicker chair actually rode in the cab with us the whole way home. It was probably not the most comfortable car ride I’ve ever had… lol!
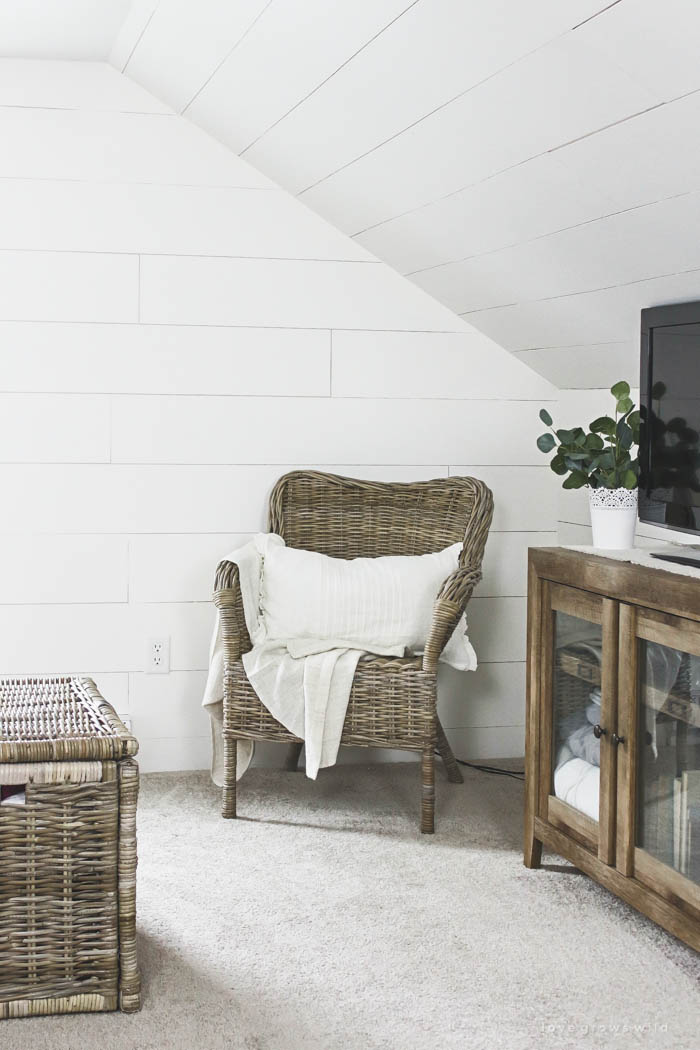
I did want to give you a quick look at how our little knee wall doors turned out though. I’m using some creative furniture placement to hide them even more, but they blend in with the wall SO much better now! I just need to find a solution for hiding those annoying television cords… suggestions welcome!
Okay guys, that’s all for today! This is just the first project we’ve tackled in here but already it feels like a completely different space. I’d LOVE to hear your thoughts! Do you love planked walls as much as I do? Was this tutorial helpful? What do you think of the changes so far? Leave a comment for me below!
Check out the rest of the bedroom makeover posts:
Master Bedroom Makeover Plans
Wood Beam and Lace Curtains
Farmhouse Window Trim
LET’S KEEP IN TOUCH!
Subscribe to Blog | Browse my Shop | Follow on Facebook | Follow on Twitter
Follow on Google+ | Follow on Pinterest | Follow on Instagram

Oh my gosh Liz, you have got patience to fill in all those holes. I think I would have left them and called it character…LOL. The final result is amazing. I want to rip up our carpets upstairs and add planks to the floors and paint them white! Am I crazy? I will hit a home run if the floors look like your walls when I am finished! Thanks for the inspiration once again.
AH-MAZING! Liz, I love everything about this post! So pretty
The plank walls look great! I used the same underlayment for one wall in our main bathroom. It is still a work in progress but I love the look. The spacers you used were a great and more finished idea. My wall didn’t have any outlets or switches so it was just straight planks. Getting the kids to help is awesome. Our boys are now 16 and 18 and they have helped so much that last summer they stripped textured ceilings on our main floor.
Gorgeous!!! I, too, am obsessed with plank walls and how they transform a space so easily! We used the same material and method to do a wall in our guest room and I’m really, really itching to do it in our living room too. I can’t wait to see everything else you do in here, it’s already beautiful 🙂
OMG, I LOVE this room!! The plank walls are GOREOUS!! I want to do this in a room in our house so badly. You really made it seems acheivable. Thank you thank you. I can’t wait for more of your reveal. Great job!!!!
Okay – you are brave. All those angles – I would have been too overwhelmed to even jump in. I’m so impressed & I absolutely love it! (Our Ikea is about 6 hours away too- have not been yet) I can’t wait to see what you do next.
The bedroom walls look absolutely amazing!!!
catchatwithcarenandcody
Looks great .. We just did this for our sons nursery as well. So simple yet impactful !! Love it!
This would be so sweet in a nursery!
Looks great! I actually changed my cable cord to white one for a few dollars and used a white extension cord …then tucked them up against wall so they kinda blended in and all the dark cord hid behind my dresser! Those cords make me crazy to see…when they match it’s less noticeable. Hope that helps…although I will be checking back to see if anyone else has a better solution!
I really should switch to white cords too… that would make a big difference I think. Why hasn’t someone figured out a way to make these things cordless yet?? Lol!
What a wonderful difference using the planking has made to your master bedroom. I love how your whole family helped making your vision become real. So updated, warm, creative and fun!!!
I also love the Ikea pieces you picked out too, I can’t wait for the next reveal.
Thank you for all the pics with each step, it really was a lot of work, but one project that will be enjoyed for a long time.
Thank you so much, Debbie
Your bedroom is beautiful, the planks really do add the “old” back in. The contrast of the wicker and your furniture is perfect with the walls.
Cyn
AaaaMaaazing! Great job!!
Beatiful post. The explanation is very good and perfect. Love the way you explain it and the images. Good job!!
Looks fantastic!!! I have wall envy now! lol Thanks for sharing how you did it. I love the look it give you room and the way you worked the door in is so clever. Can’t wait to see the rest!
This room has some serious WOW going on! Those planked walls look AMAZING! I’ve been thinking about planking some rooms in my home and this post just made it a priority project. I can’t wait to see what you do next!
Holy cow, Liz. That turned out amazing! I absolutely love the planks and the white! And those little doors really do blend in!!!! I can’t wait to see the rest!!!
We’ve planked two ceilings and a backsplash in our house, so I can appreciate all the tedious work that went into this. It’s uh-mazing. So, so beautiful. Love, love.
This is SOOOO stunningly gorgeous! I can’t get over it!! I have wanted to try this somewhere, but haven’t pulled the trigger yet. You’ve definitely reignited that burning desire HA! Great work 😉 ~Rachael
Liz, I love this so much!
I’ll be featuring you next week on the blog… You are a ROCK STAR!
xo
Oh Desi, I just love you! Have a beautiful day, sweet friend! 🙂
Looks amazing! I’ve read many tutorials using the same materials, and adhesive was used, along with a lot of board warping problems. Did you experience any of that? I didn’t read anywhere that you needed adhesive.
Hey Brooke! No, we did not use any kind of adhesive on our master bedroom planked walls, and we’ve had zero issues with them. We did use adhesive when we did board and batten in our living room/dining room, but that was mostly because we were nailing the boards into plaster (unlike our nice, new drywall upstairs), and we wanted to make sure the boards wouldn’t come loose if the nails didn’t go into the plaster well. But I can happily say that no adhesive was needed with the lightweight flooring underlayment we used in the master bedroom! If you used a heavier material like tongue and groove boards, adhesive may be necessary. I hope this helps! 🙂
This treatment turned out great! Could you move the electrical box inside the storage closet and make a small hole in the wall for cords to pass through? Then you wouldn’t see the outlet!
That’s a possibility… thank you for the suggestion! 🙂
you can also tuck the cords under your carpet then re-tuck the carpet back against the wall.
the room looks awesome.. I have been wanting to do this in my room. Thank you for the step by step process, makes my life easier 🙂
This is fantastic! I wish I would’ve found this tutorial during our home renovations awhile back! Using the sheeting is a brilliant money-saver! May still have to do this in our upstairs guest room! Love how it turned out! Great work!
So excited that I just stumbled across your website! Your work is amazing! Love those plank walls!!!
I love the glass door cabinet….where’s it from
Hi Donna! The cabinet is from Sauder. I hope this helps! 🙂
Just amazing…wonderful! Such an inspiration to do mine!
I’m so going to copy this for my kitchen and my living room, I love,love this look.
Your many pictures and explanations are so detailed! Thank you so much for being so precise and sharing your work with us.