
Thanks to Annie Sloan Unfolded for the supplies to complete my furniture makeover!
New updates in my living room today! I’m discovering lately that I have a pretty intense love for furniture makeovers. Aside from the giant mess it creates (or maybe, I create), with paint cans everywhere and rooms re-arranged to provide a make-shift painting studio, it’s something I really enjoy doing.
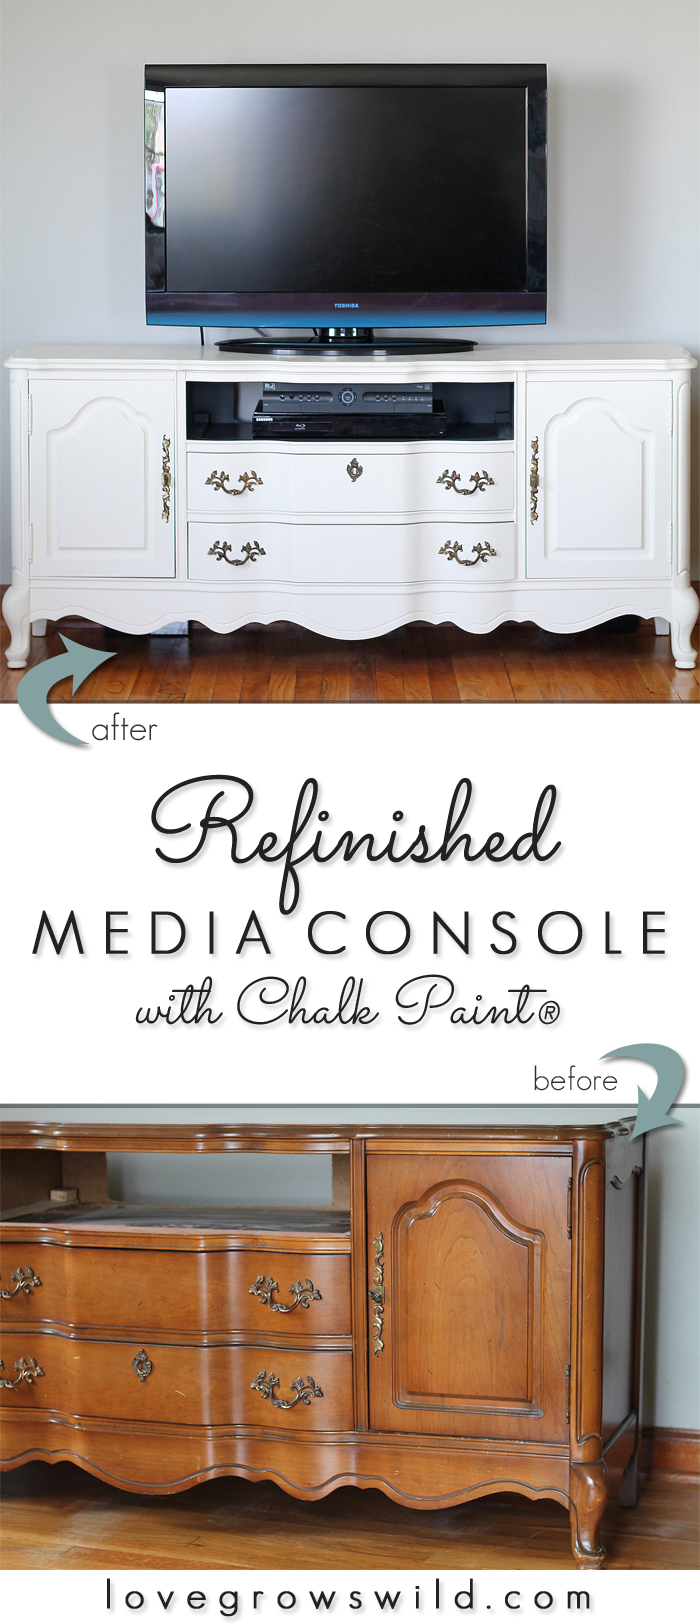
The whole process is just exciting to me… studying the piece of furniture and carefully selecting the perfect color… cranking up some tunes on the stereo and spending a sunny afternoon just me and a paint brush… and the best part of all… seeing the completed transformation! And BOY, did this piece of furniture I’m showing you today need a major transformation! Your jaw is going to drop at this before and after!


Are you ready for it…
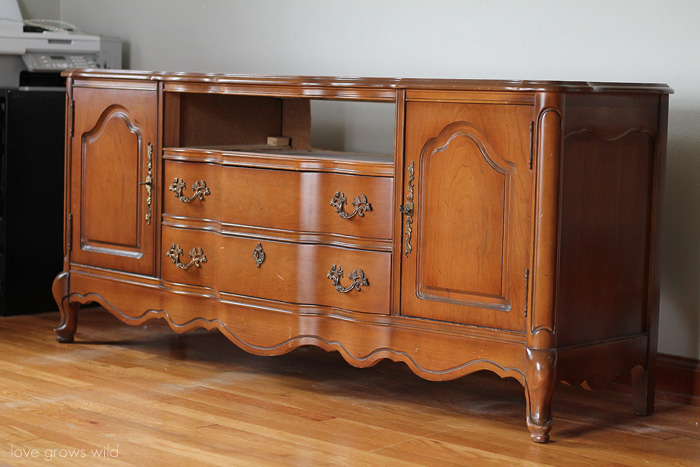
It’s a gorgeous piece, but TOTALLY not my style. Maybe my grandma’s, but not mine. I think when you first get married and have your own place, everyone feels the need to unload their old or extra furniture onto you. Did that happen to you too? Don’t get me wrong… I am BEYOND grateful for free furniture. Have you seen prices in stores lately? It’s a good thing I’m handy with a paint brush! Don’t worry… stick with me, and I’ll teach you how to be a paint brush professional too! 😉
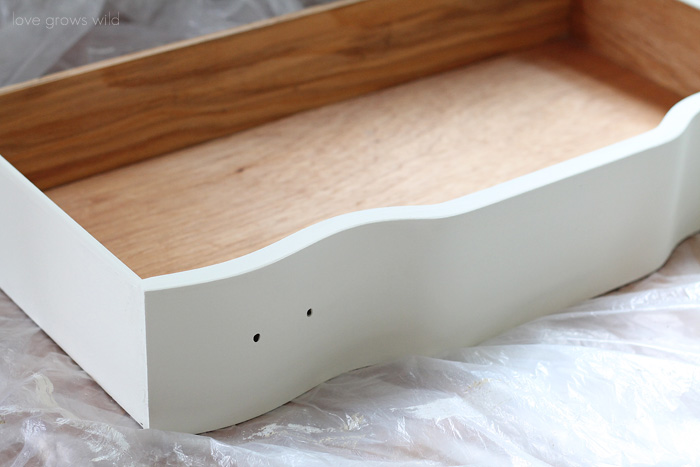
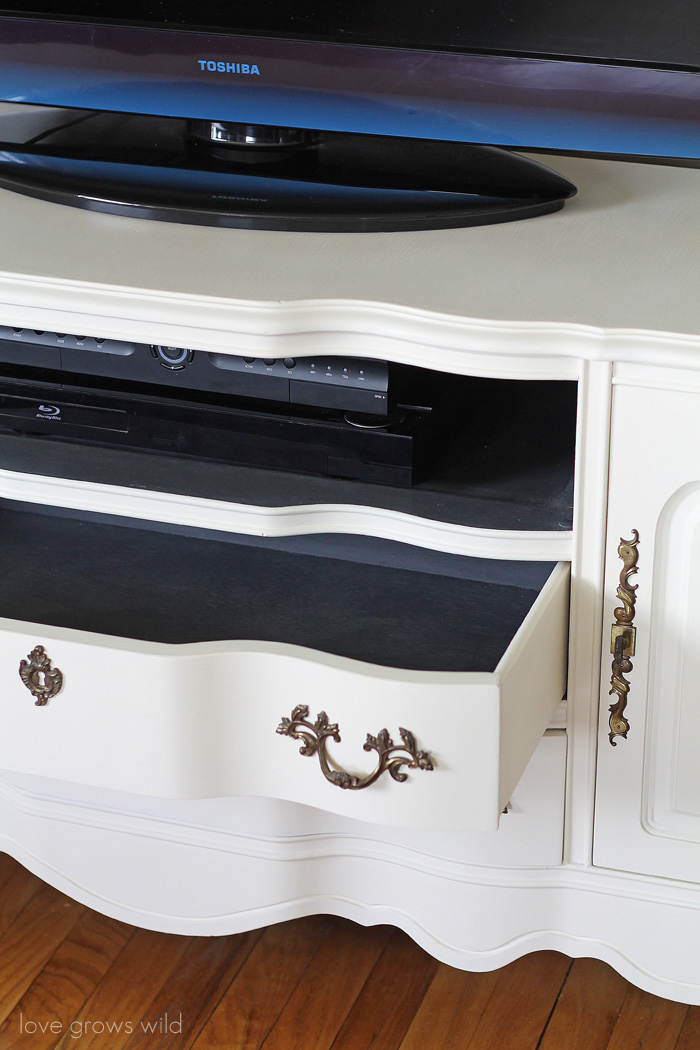
So this piece was originally part of a dining room set from my husband’s uncle’s widow’s parents. You totally needed to know all that detail, right? It was meant to be used as a buffet, but our tiny dining room doesn’t have a lot of space, and we happen to be in desperate need of a TV stand/media console. Do you see where this is going? We pulled out the top drawer to make a space for our satellite box and DVD player and cut a hole in the back for the cords. Then it was time to get the paint brush out!
Step 1: Remove doors, drawers, and hardware
It’s much easier to paint without the hardware on, so I removed each piece and kept them all in a bucket. I always like to keep the screws with each piece of hardware it belongs to so I’m not trying to solve a puzzle later when putting them back on.
Step 2: Paint!
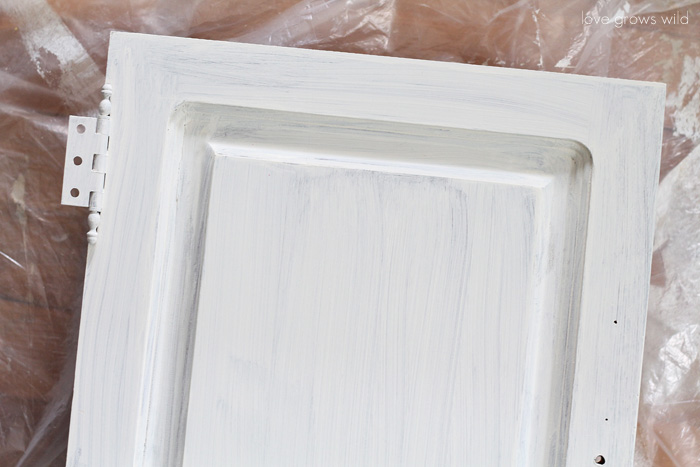
I’ve always wanted to try Chalk Paint® decorative paint by Annie Sloan, and this console was the perfect piece to test it on. With Chalk Paint®, you are not required to sand the previous finish off, which means you can get started painting right away. No sanding necessary… I’m sold already! This piece of furniture has a lot of curves and grooves, which would be nearly impossible to sand. The only thing I did to prepare the console for paint was wipe down all the dust and… ahem, cobwebs that had accumulated since I last dusted. It may have been awhile.

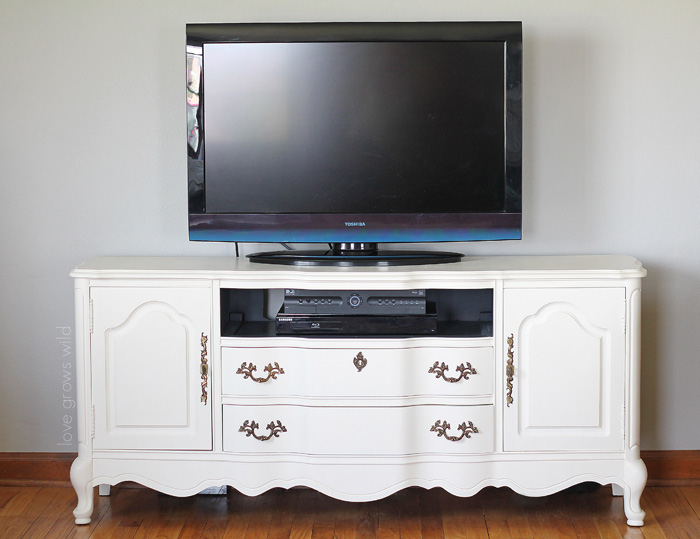
With all the wood tones going on in my house, I needed to lighten up the space, so I chose to use the color Old White. It’s the perfect balance between bright white and soft ivory, which I just love! There’s no fancy technique used here, just a good quality paint brush and nice, even brush strokes. Here’s how the cabinet door looked after one coat of Old White… it definitely needed two.
You’ll notice I painted the front and sides of the drawers in white, but left inside blank. The inner pieces of the console got a special treatment that I’ll show you in a minute!
Step 3: Wax
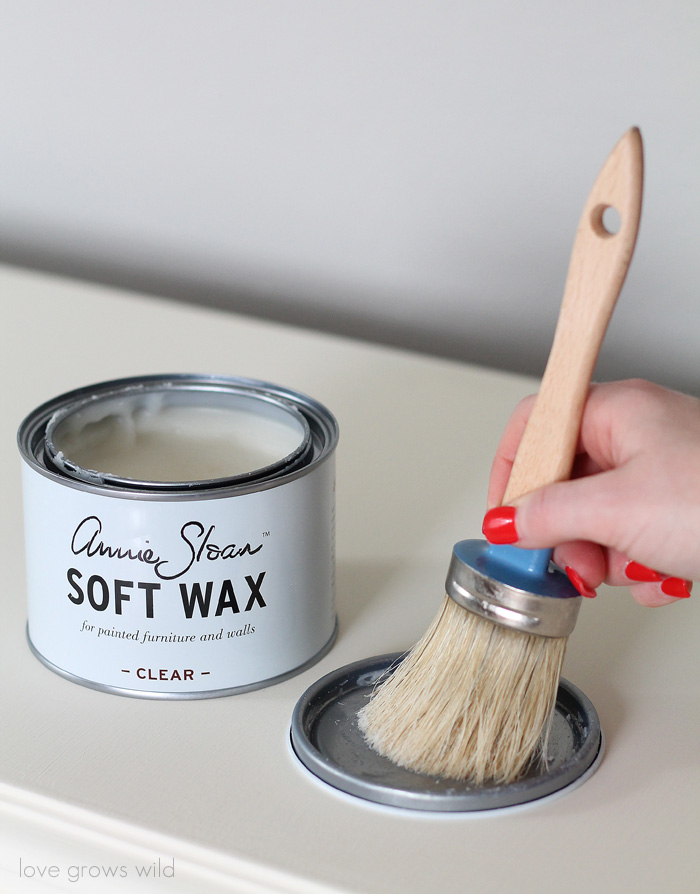
The Chalk Paint® dries pretty quickly, so you can knock this project out easily in just a day or two. Once I was finished painting, I sealed the console with the Annie Sloan Clear Soft Wax. The wax can be easily applied with a brush and gives the furniture some durability and protection against little boys driving their race cars up and down it. No surface is safe in my house full of boys!
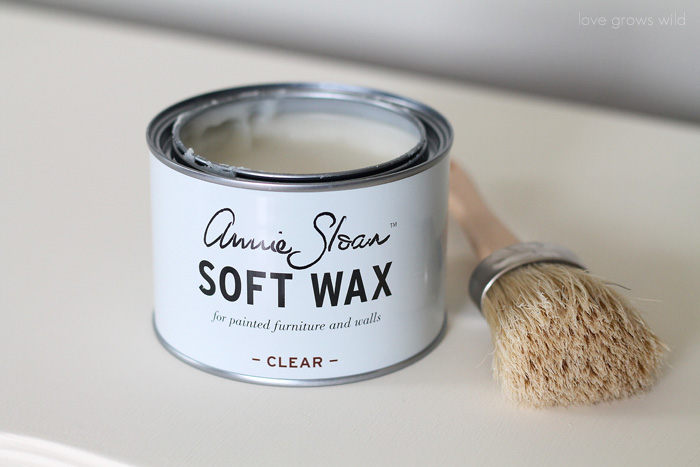
The wax deepens the color of the paint just slightly and gives it a beautiful luster. To apply the wax, I just scoop a little bit onto a paper plate or even the lid of the can and dab my brush in it. Then I swipe the brush over the furniture, spreading the wax evenly over the painted areas. A little goes a long way in this process! Once I’ve applied the wax, I go back over the piece with a clean, lint-free rag to buff and remove any excess wax.
Step 4: Re-attach the doors, drawers, and hardware
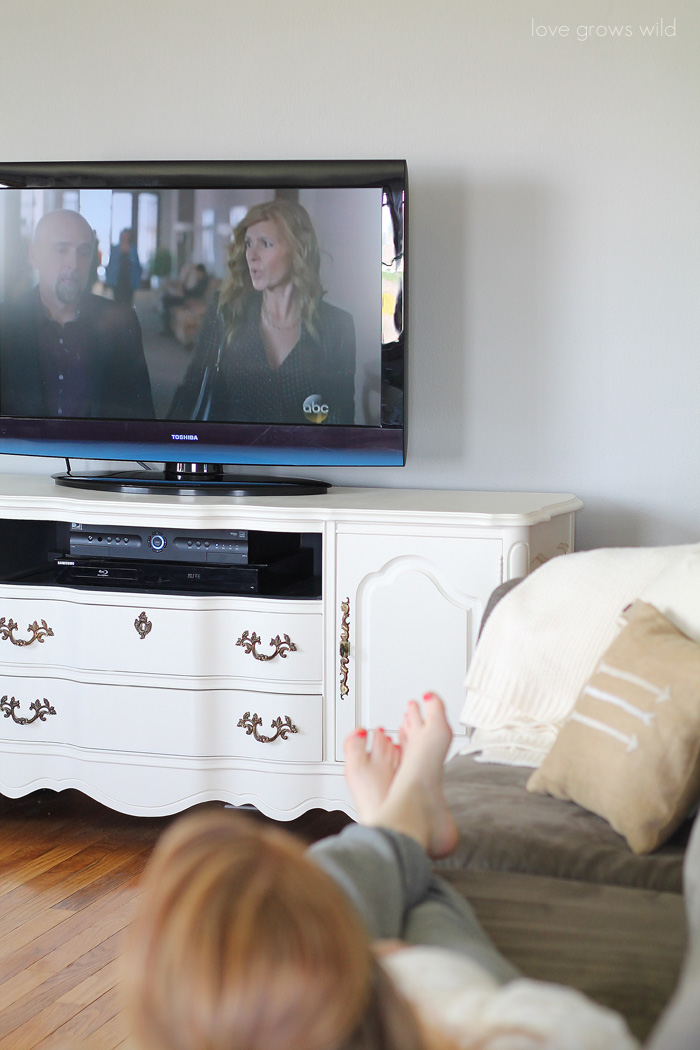
And we’re done! My old, dark buffet is now a light, bright, and beautiful media console for our living room! What do you think??
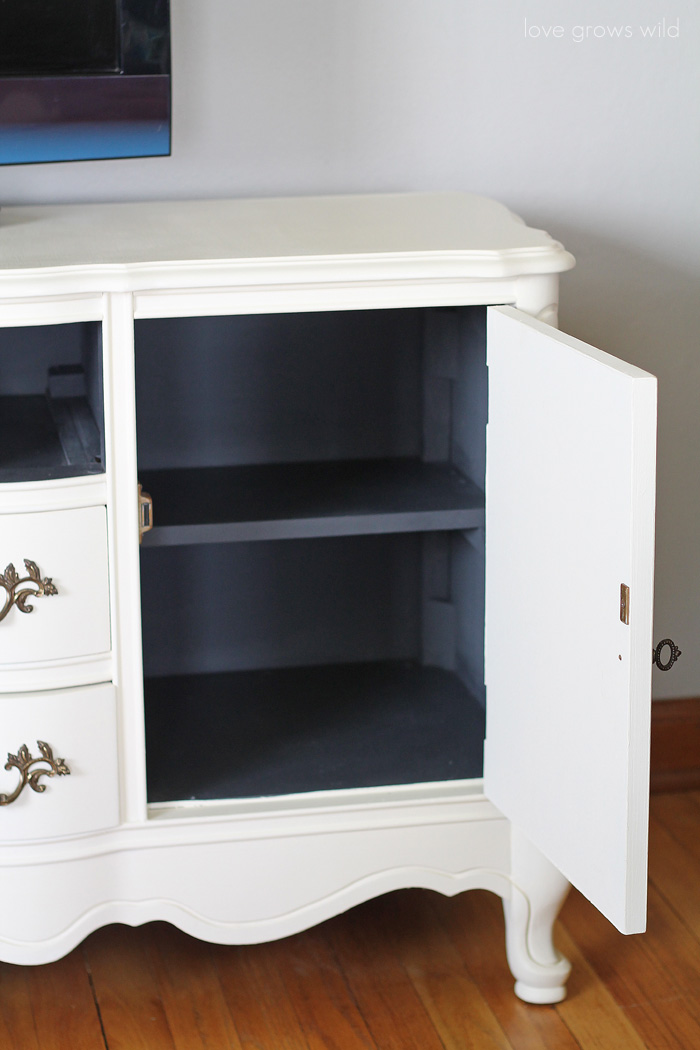
So remember when I said that the inside of the console got a special treatment? Instead of painting the insides of the drawers and cabinets white, I painted them in a smoky, charcoal gray. LOVE this feature! Here’s why I did it:
#1 Because we’re using the top drawer space to hold our TV boxes, we wanted to minimize that area as much as possible rather than draw your eye to it. The charcoal gray paint blends in with the black equipment, making it much less noticeable. I have to admit… my husband actually came up with that genius idea!
#2 Painting the inside of a drawer eliminates that stinky, antique smell that lingers long after you bring it home. And because I knew these areas would have a lot of hands grabbing things in and out of them, I figured gray would show much less wear, tear, and dirty fingerprints than white would. I love my children dearly, but I do not love all the fingerprints they leave everywhere!
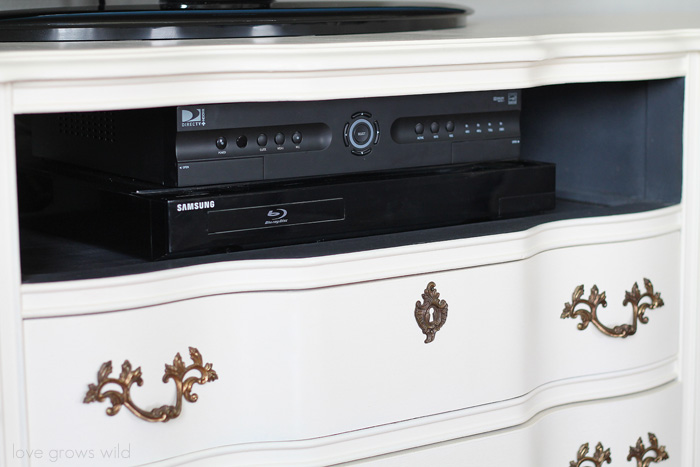
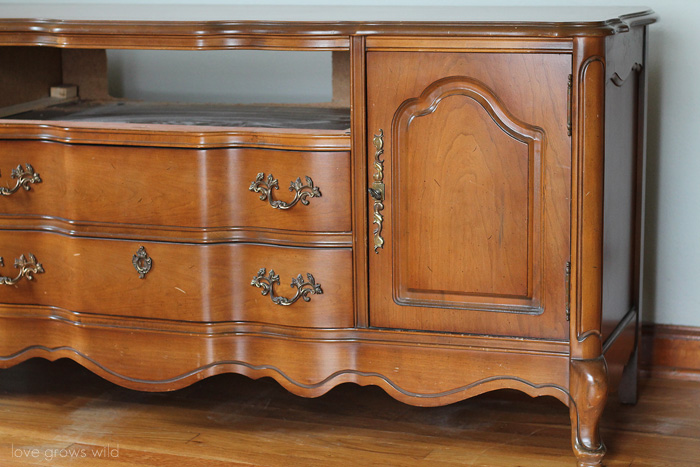
Can we just talk about this hardware for a minute? I’m totally swooning just looking at these photos again! I decided early on to leave the gorgeous gold antique finish they already have, which is a beautiful contrast against the cool white and gray furniture. Seriously… look at these details…
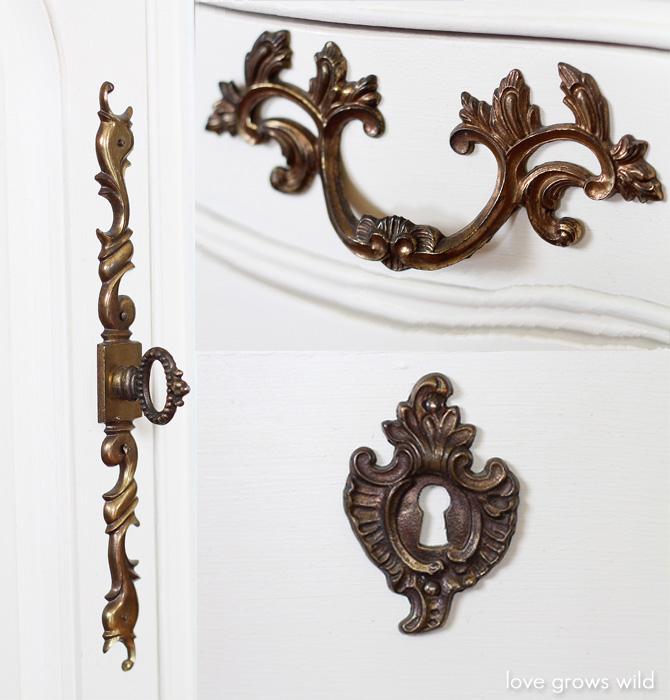
You’ll have a hard time finding intricate hardware like this in stores today! See, hand-me-down furniture is the way to go!
Here’s the inside of the cabinets that I painted gray:
And the inside of the drawers too:
I think two-tone furniture like this is such a fun surprise when you open them up!
Check out the side profile of this curvy girl:

A simple, metal-frame glass coffee table sits next to the newly-painted media console, with a fabulous succulent planter on top. The planter is a recent addition to the house, and I just love it!
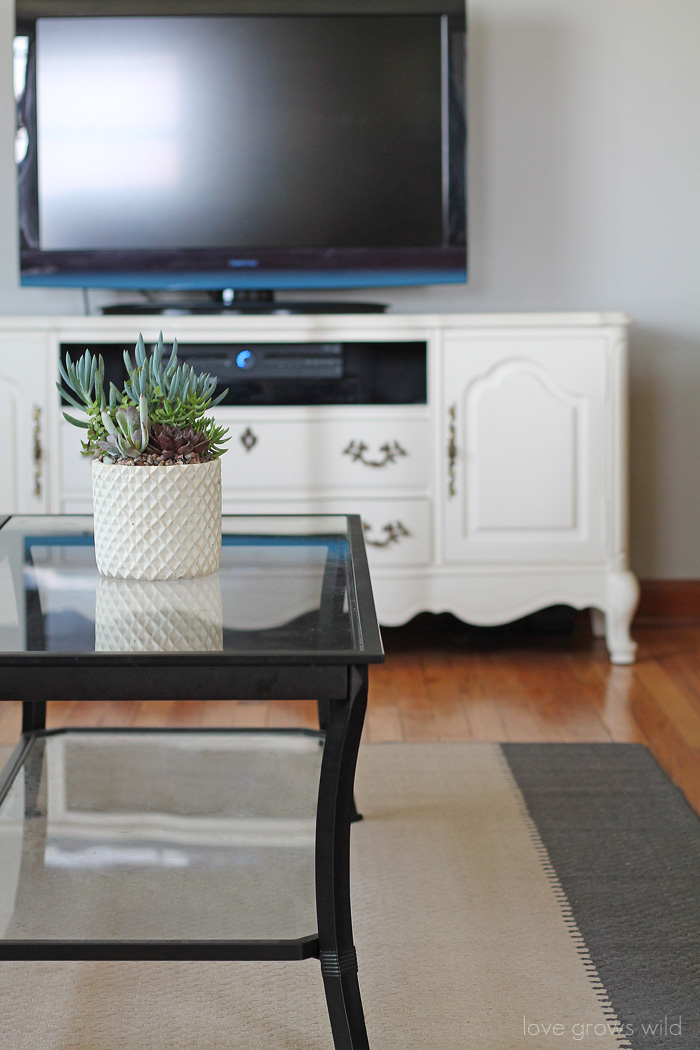
Now I can kick back and catch up on my TV shows without thinking… “Gosh, that TV console needs painted desperately!” I’ll give a ten cookies to whoever can recognize my absolute favorite show on television right now!!
Like what you see? Subscribe to Love Grows Wild so you’ll never miss a post!
Follow along on Pinterest, Google+, Instagram, and Facebook for more fun!
The Annie Sloan products I used in this post came from Annie Sloan Unfolded. You can locate a local retailer and follow them on Facebook, Twitter, or Pinterest to discover more project inspiration!
Thanks to Annie Sloan Unfolded for the supplies to complete my furniture makeover!
More projects from our home:
LET’S KEEP IN TOUCH!
Subscribe to Blog | Browse my Shop | Follow on Facebook | Follow on Twitter
Follow on Google+ | Follow on Pinterest | Follow on Instagram

I love, love, love your TV console redo! Looks amazing! And the TV show is Nashville! I absolutely love that show!
You got it, girl!! I’m going to miss that show this summer! And thank you for the love on my furniture makeover… it made my day!
xoxo Liz
Liz, that buffet table came out fabulous. I just love it!.. I have this old pine corner shelf that is in desperate need of a makeover. I think I will try your method. I really do need a fire place make over as well. I have to go read yours. You Inspire me. Have a great day!!
Your sweet comment made my day, Connie! I think you’re going to love using the Chalk Paint as much as I do!
LOVE it! It’s so funny how a coat of paint can make a piece of furniture look completely different. It looks like it works so perfectly as a TV stand!!
My husband thought I had gone completely loco when I told him how I was going to use this furniture… but he’s a total believer now! Doesn’t the white paint make SUCH a difference? Thanks for stopping by to see the transformation, Nicole!!
xoxo Liz
In one word …Stunning!! in Love with the Grey also..Thanks for Sharing.
Thank you, Cindy!! Isn’t the gray a fun little surprise inside? So glad you could stop by to check it out!
xoxo Liz
Wow, that looks amazing! You did an incredible job with that piece. Great photos too!
My weekly Say G’day Saturday link up has just started and I’d be thrilled if you could join in and share this post-it would be a fabulous addition!
Best wishes for a lovely weekend,
Natasha in Oz
Thank you, Natasha!! I love doing fun transformations like this! The end result is so rewarding. 🙂
Thanks for stopping by!
– Liz
Yup, you are officially my hero!! I just love seeing all the fun projects you tackle! I just wish you were closer, so you could help me tackle mine too 😉
You know the massive amount of wood tones in my house… isn’t the white so much better?? After your awesome Florida trip maybe we can plan a day to tackle some projects. Oh wait… kids and husbands are home all the time now! Remind me how we are we going to survive summer, again? 🙂
Well I’m sure I don’t have to say it, But this Came out BEAUTIFULLY! Can’t wait til I’m able to venture out into Chalk Paint
Thank you so much, Christal!! Using the Chalk Paint makes refinishing furniture a breeze! I love anything that makes my life easier with no prep work. 🙂 Thanks for stopping by, girl!
Awesome job! I have a china cabinet with the same type of hardware on the doors as you had here. Did you have any problems taking them off? Do they just pop off?
Thank you!! All the hardware had screws that came out easily, and the doors of the cabinets had a few tiny nails that we just gently pried up with the hardware. It was pretty simple!
I love this, and your gallery wall tutorial as well. Nice job! I have a gallery wall in our entryway, but I want to make another one in the kids’ playroom, and your ideas will help.
I think getting started on a gallery wall is the hardest part! But once you get a few ideas rolling, it’s easy to fill in the blanks. Have fun decorating in your kids’ playroom! Such a fun space to decorate!
You media console looks great! I also like your fireplace, and the gallery wall looks like something I want to try for my home. Great ideas!
Navy Wifey Peters @ Submarine Sunday Link Party
Thank you!! It’s fun when a room finally starts to come together! So glad you could stop by to check it out. 🙂
Cute! I did the exact same thing a few years ago (the piece even looks the same!), only I painted the inside of mine red. And your pictures are way better than mine. 😉
Red would be so fun, Christina! I’m not a huge color person, so gray was a safe choice for me. And I’ve definitely had to learn over time how to use my darn camera, because most of my early photos were not so pretty! Lol 🙂 Thanks for stopping by to check out my project!
I love how this turned out. I have a old chest of drawers as our console table too. They work perfect for it. I have been wanting to try the chalk paint, all of the projects that I have been planned I already have paint purchased. But I am itching to try this, it seems soooooo much easier. I hate sanding
Sanding is probably not my favorite activity either! Lol! I can handle a little bit of sanding to give a piece that perfect distressed paint look, but not when I have to sand off layer after layer of different finishes! I think you’re really going to enjoy using chalk paint when you give it a try! Have fun painting! 🙂
Hi,
I have a buffet that I’m about to paint, and it looks to be about the same size. Can you tell me how much paint it took you to do this project with 2 coats? Love how it turned out–you’ve given me inspiration 🙂 Thank you!
Hi Shannon! Of course! I had 1 quart of Chalk Paint and only used about half to paint 2 coats on the buffet. Have fun painting!!
Shannon, love this look!! I’ve used white chalk paint on pine funiture to freshen up a bedroom but now I’m thinking of doing the same on the cherrywood laminate furniture in the living room as yours looks so cool! Do you think the paint will work ok on laminate?
Yes, Chalk Paint adheres very well to just about any surface. If you’re uneasy about painting the laminate, you can try roughing it up a little bit first before painting. Just use some sandpaper, and that should help it adhere even better! Have fun painting!
Thanks so much! I’m just waiting for the paint store to get more stock so that I can crack on………!
How fun! So excited for you!
Hi, I really like all your projects…. One qn… When do you decide to paint the top white and when do you decide to paint the top second tone?
Hi Valerie! I’m not sure I understand your question… could you clarify? I’m happy to help! 🙂
Love the buffet! I am going to paint mine this weekend, but am wondering what you did with back of buffet? Did you paint that as well?
Hey Jessica! Great question. I didn’t paint the back at all for two reasons: #1 The back on mine is a fake, cheap piece of cardboard-type material and #2 It will be sitting against a wall anyway. The less painting I have to do, the better. 🙂 I’d love to see how yours turns out!
Ran across your blog while searching for info on how to refinish my grandmother’s dining table, hutch and buffet – which is an exact match of your buffet! As the current finish goes well in our home (and she just passed a year ago) I really want to refinish, rather than paint. Thinking I’m going to tackle the top surfaces of each first and maybe the sides later. I’m not naive enough to believe it will be perfect. Just looking for “better.” Any suggestions of products or how to? At this point, I’m not even sure what type of coating (shellac? varnish? oiled?) it is, what type of wood, or what the stain color might be. Help?!
Hey Kim! Are you looking to paint it, re-stain it, or just refresh the existing finish?
Hey Liz, I acquired an old antique dresser that is curvy like this, but it was either previously painted or veneered. My problem though, is that the paint/veneer is chipping and there is some damage that needs to be adressed. I found fixes for the damage (bondo and lots of sanding), but I’m not sure how to tackle all of the chipping since it is curvy like this. Tbe back also need to be done because it is being used as an “island” in my kitchen but that has some problems also. If I could get some help/tips/pointers that would be great as I’ve never redone any furniture. If you email me, I can send you some pictures so you can get a sense of my worries lol. Thanks a lot. 🙂
Hi Marissa! Welcome to the world of furniture makeovers! 🙂 If the previous finish is chipping off, you’ll definitely want to smooth that out as much as possible before re-painting. You can use a hand sander for flat areas or sanding blocks for the curvy parts, and once you wipe the furniture down really well to remove all the dust, I might recommend using chalk paint for your new topcoat. It adheres to almost any surface and isn’t as sensitive as normal paint if you don’t get every bit of the old finish off. I hope this helps! Best of luck with your project… I’d love the see how it turns out! You can tag me on Instagram @lizlovegrowswild